
5 Important Things to Look for Before Buying or Selling a Home
Whether you’re in the market to buy a home, or you’re getting ready to put your home up for sale, there are things you should be looking for beforehand. The home inspector should find and address these things in the home inspection report but it’s best to try and catch these things yourself before it gets to the inspection process to avoid surprises or complications (whether buying or selling). I’ve compiled a list of 5 things to look for before buying or selling a home. The best part about this list is that you don’t have to be an expert to spot these things! All you need is a set of eye balls (and in some cases a flashlight).
1) Electrical Panels
There are certain electrical panels that have been found to be defective and present serious safety concerns. These panels require replacement which, depending on who you hire, could cost anywhere from $1500 to $3000.
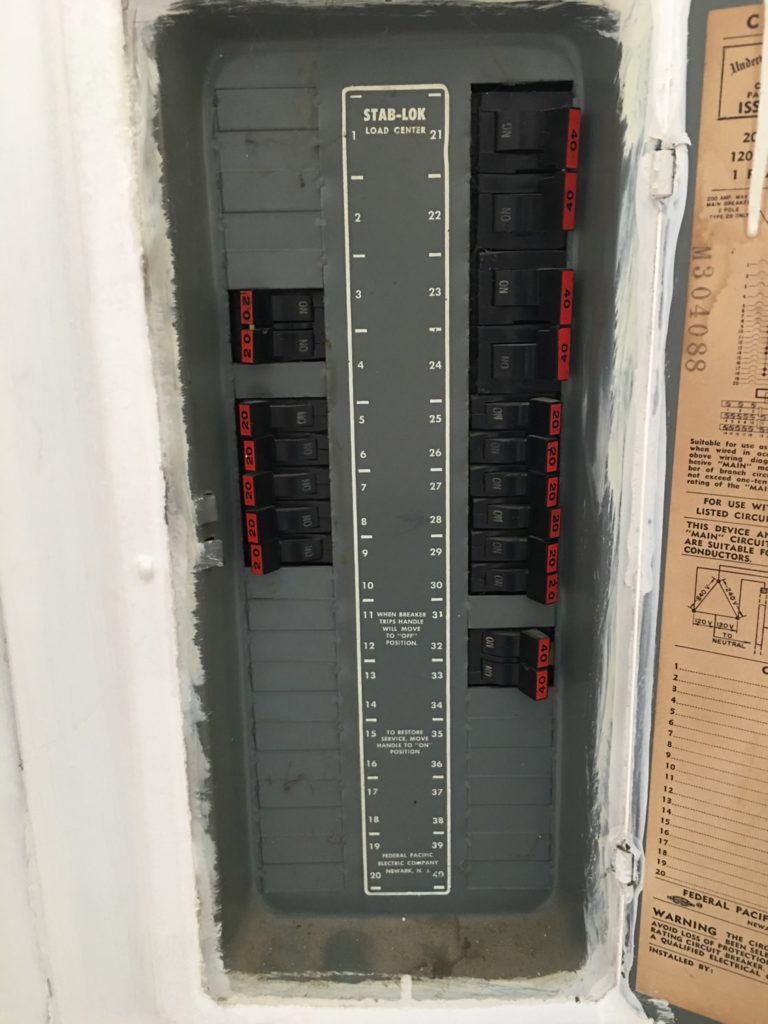
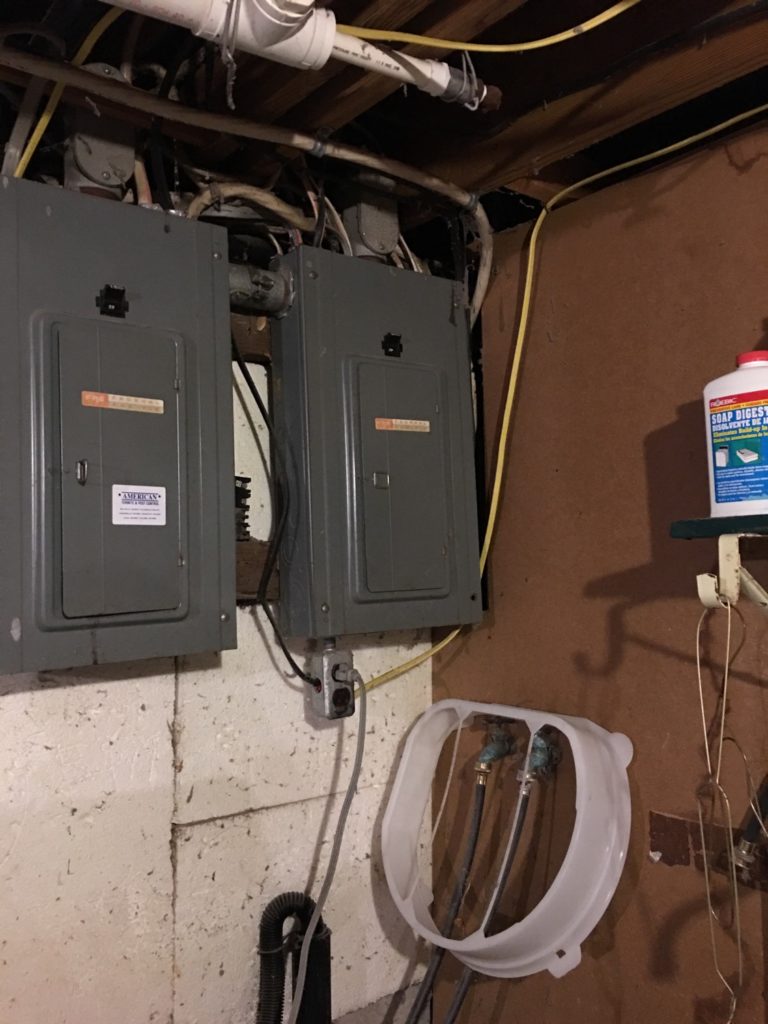
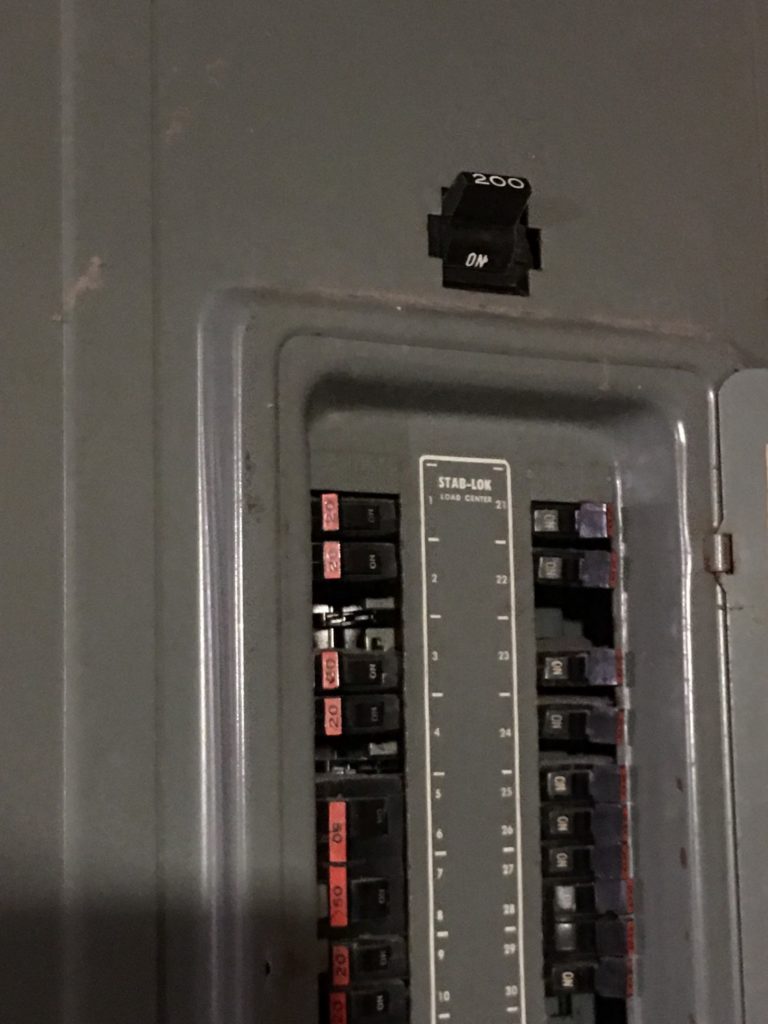
The first one I’ll talk about (that has become a house hold name) is the Federal Pacific Electric Stab-lok panel. Here are the highlights for these panels:
- From the 1950’s to the 1980’s there were millions of these panels sold. I still run into one or two each month in homes I am inspecting.
- Testing has proven that virtually every panel installed in the United States contains defective breakers.
- Testing by the Consumer Product Safety Commission has shown these breakers to have an high rate of failure. Breakers that do not trip when they are suppose to create a dangerous situation.
- Federal Pacific Electric falsified their UL (underwriters laboratory) testing, making their UL listing void.
- Roughly 1 out of 3 breakers have been found to be defective.
- If a breaker fails to trip when it should, the wires in the home that are supposed to be protected can overheat and start a fire.
Here are some pictures of what a FPE Stab-lok Panel looks like:
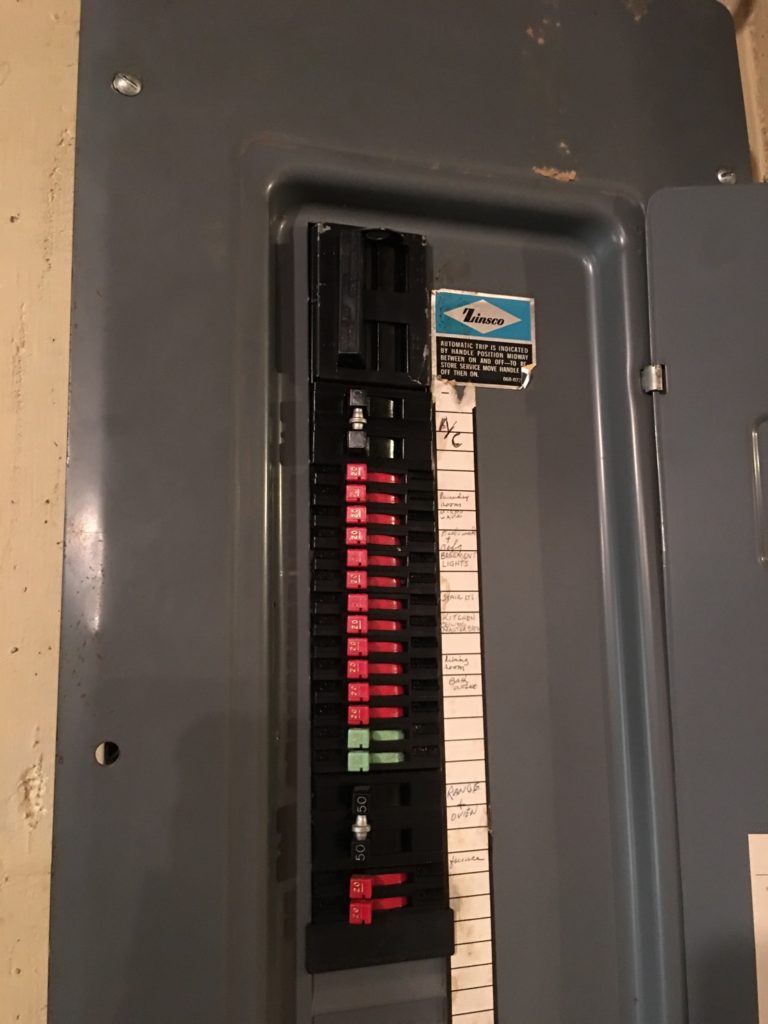
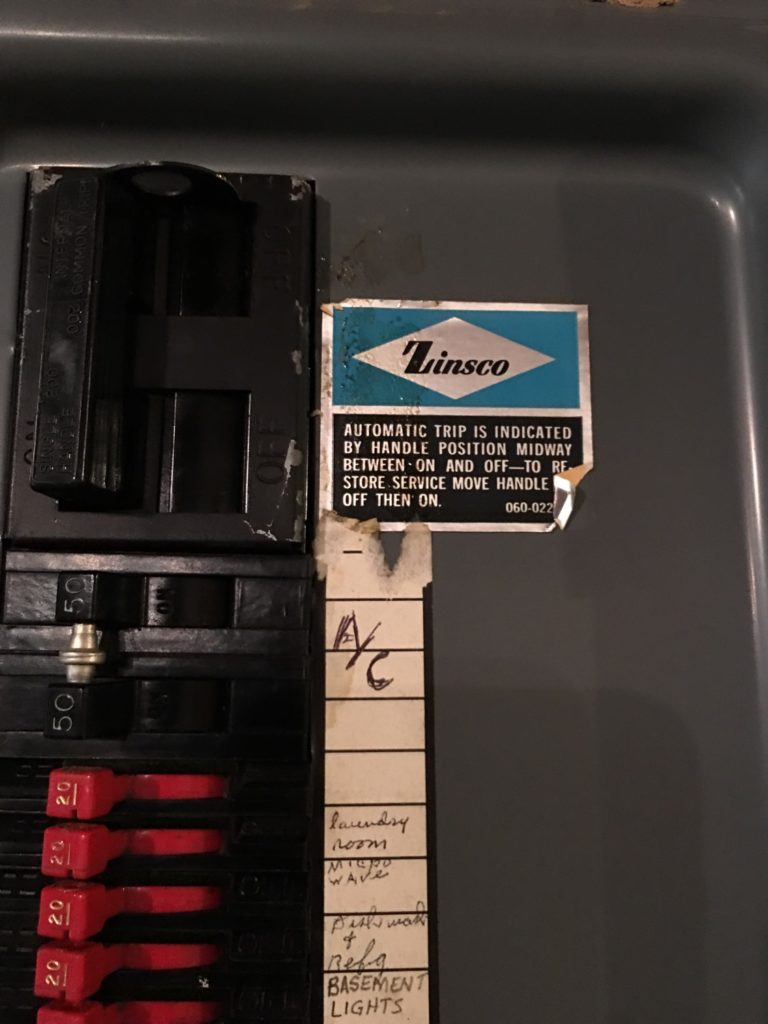
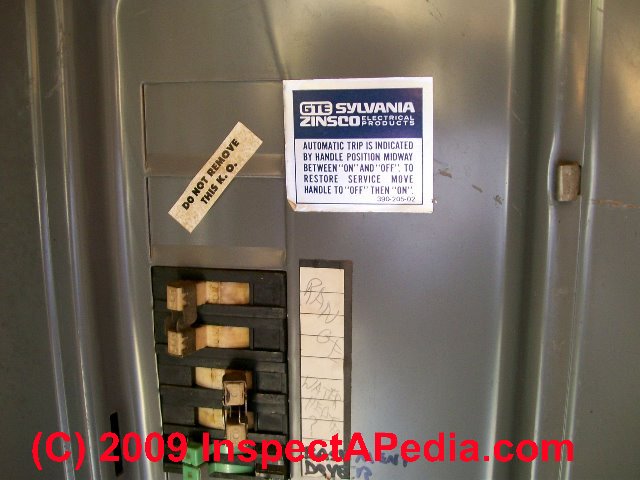
The second type of panel that has the same issues as the FPE Stab-lok is the Zinsco-Sylvania & GTE-Sylvania-Zinsco electrical panels. Here are some highlights for the Zinsco electrical panels:
- Installed in homes in the United States throughout the 1970’s
- The circuit breakers inside many Zinsco panels melt to the main bus bar. This means the breaker won’t be able to trip when necessary which creates is a fire hazard.
- The colorful breakers can help you pinpoint that it’s a Zinsco-Sylvania & GTE-Sylvania-Zinsco electrical panel (see photos below)
Here are pictures of Zinsco-Sylvania & GTE-Sylvania-Zinsco electrical panels:
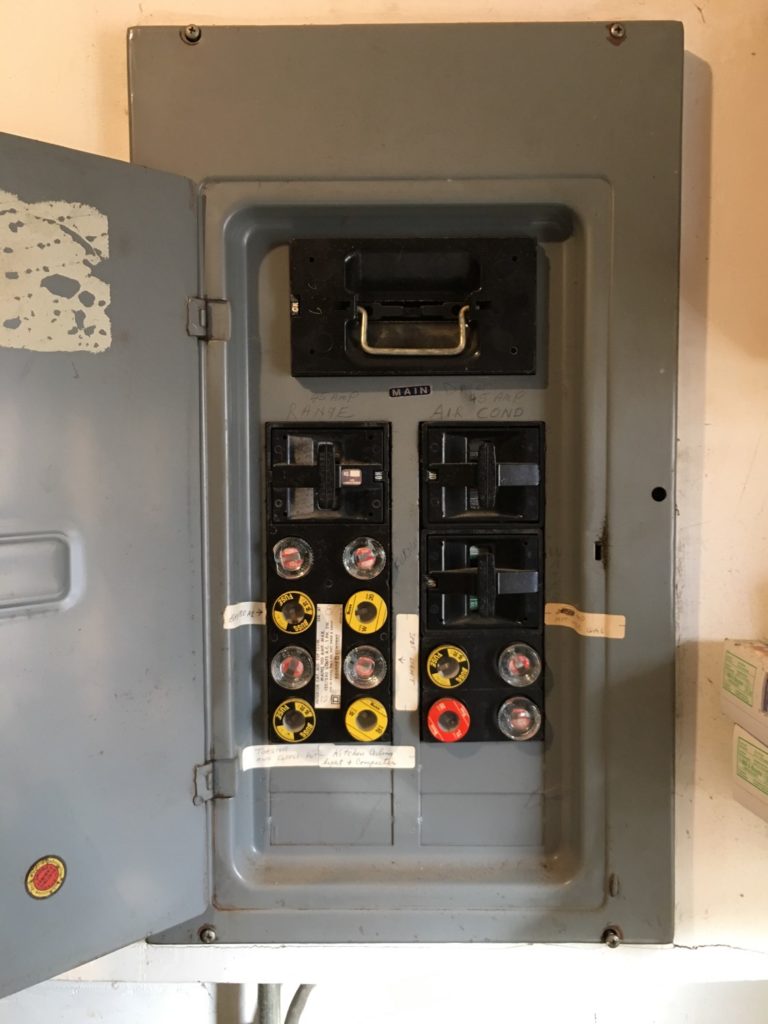
The last type of electrical panel I will talk about is a fuse panel. Fuse panels were installed in homes up and through the 1960’s before being replaced by breaker panels, which is what is used today. Fuses are not necessarily unsafe themselves (because they work the same as breakers, except fuses can’t be reset they just have to be replaced). What makes fuse panels unsafe is that they have usually been modified to serve the needs of today’s modern energy consumption, which they weren’t built to handle. Here are some things that make fuse panels unsafe:
- Placing too many things on a single circuit. Because fuse panels typically have very few circuits, homeowners often end up plugging in too many electrical appliances to a single outlet or into a power strip. This leads to fuses that blow a lot, which can lead to…
- Homeowners replace a fuse with something (like a penny) where the blown fuse once was. This eliminates the issue of fuses blowing but also removes the safety protection that the fuses provided for the circuits. The wires can end up pulling too many amps, overheat, and start a fire.
- Homeowners replace a fuse with a bigger fuse. They may replace a 15-amp fuse with a 20-amp fuse (or larger) to prevent the fuse from blowing. This creates a fire hazard because the wires on that circuit are only rated to handle 15-amps, not 20-amps, which can cause the wires to overheat and start a fire.
One of the main reasons to replace a fuse panel is just because of the age. You’re talking about an electrical panel that is 50+ years old and having old electrical can be unsafe because of the wear and tear it experiences over time.
Here is a picture of a fuse panel:
2) Knob and Tube Wiring
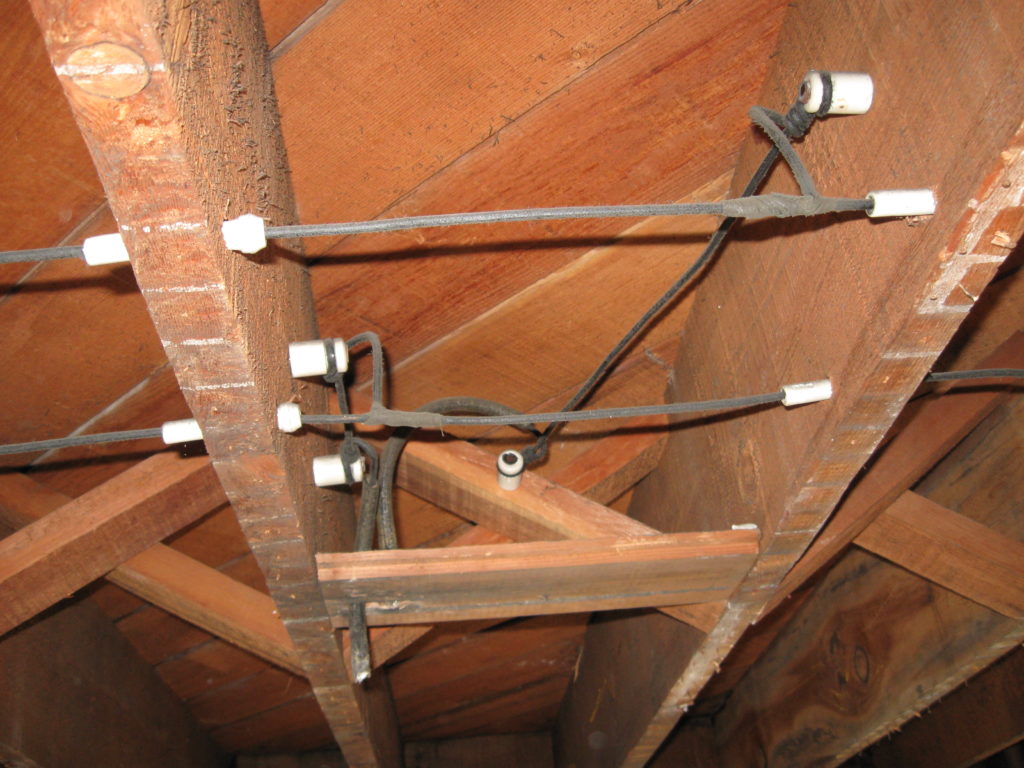
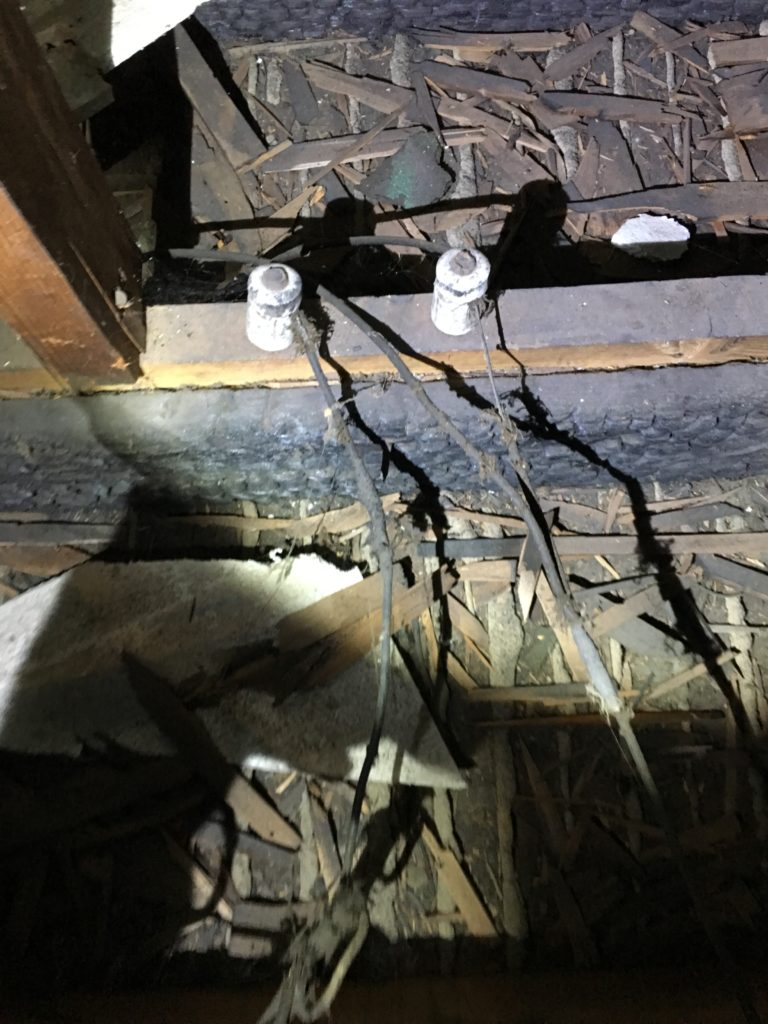
Keeping the topic of wiring going we have Knob and Tube. Knob and Tube wiring was predominant in 1880’s to the 1940’s. It consists of single-insulated copper conductors run within wall or ceiling cavities, passing through joist and stud drilled-holes via a protective porcelain insulating tube, and supported along its length on nailed-down porcelain knob insulators. Where conductors entered a wiring device such as a lamp or switch, or were pulled into a wall, they were protected by a flexible cloth insulating sleeve called loom.
The cost of rewiring a house really depends on size and access/difficulty and can range anywhere from $1000-4000
The main issues with knob and tube are:
- No ground wires. Receptacles in the home are not grounded which presents a safety concern if they have been switched to a 3-prong style grounded receptacle. Most major appliances (computers, tvs etc.) require a grounded receptacle and if there is not one it creates the danger of possible shock or electrocution and damage to the equipment.
- It’s really old. Knob and Tube can be anywhere from 80-140 years old depending which is extremely outdated for the electrical supply demand and safety requirements of modern time and modern household usage.
- Blown Fuses. Because of the higher electrical demand of modern usage it can lead to homeowners over-fusing to prevent fuses from blowing (assuming the home has a fuse panel). Over-fusing allows a higher amperage of electrical current than is allowed to flow through the wiring which can cause wiring to overheat, creating potential for electrical fires.
- Overheating. If knob and tube wiring is in the attic of the home then chances are, over the years, it has been covered with insulation. Knob and Tube wiring was designed to be installed in open air so it can properly disperse heat. When it gets covered with something like insulation then the heat from the wiring can not disperse properly and the wiring can overheat which can cause a fire.
- Can’t Get Insurance. Several insurance companies throughout the country will not write new homeowners’ policies at all unless all Knob and Tube wiring is replaced, or an electrician certifies that the wiring is in good, safe condition.
- Can’t Get Home Loan. Many lenders are unwilling to finance a home that has Knob and Tube wiring unless the electrical service is upgraded to a modern wiring.
Here are some pictures of knob and tube wiring:
3) Major Appliance Age
Major appliances such as the furnace, air conditioner, and water heater all have typical life expectancies. These appliances are going to be the most costly to replace when the time comes to do so.
The typical water heater will last 6-12 years, although some may last longer or not even that long. I have seen water heaters that are 30 years old and I have seen water heaters go out after as little as 4 years. In terms of appliances, the water heater is the cheapest to replace at around $500-1000 installed depending on who you hire and type of water heater you purchase.
Furnaces can last anywhere from 15-25 years. I’ve seen many furnaces over 25 years old and some over 40 years old. As with any appliance it’s all about maintaining it, regular maintenance can make it last a long time. The cost to replace a furnace can be anywhere from $2500-6000+.
The exterior part of the air conditioning system (the condenser) has a typical life expectancy of 8 to 20 years depending. These units can cost $1500-2500 to replace depending on who you hire and the type/brand of unit you purchase.
The interior part of the air conditioning system (evaporator) has a typical life expectancy of 15-25 years. This is the part that sits above the furnace in a standard central system. The cost to replace these can run anywhere between $600 and $2600 depending on who installs it and the brand of unit you purchase.
Determining the age is easy assuming the data plate for the appliance is still intact. You just need the serial number off it usually. Sometimes you may get lucky and the date of manufacture will be listed directly on the plate. Most of the time though you’ll have to search the serial number to determine age.
To determine the age of the appliance just go to: http://building-center.org/ . You can also just Google “AO Smith Water Heater Age” or “Goodman Furnace Age” and usually the first link to come up in results will be from the Building Center website and you can click that, and it will take you straight to the page.
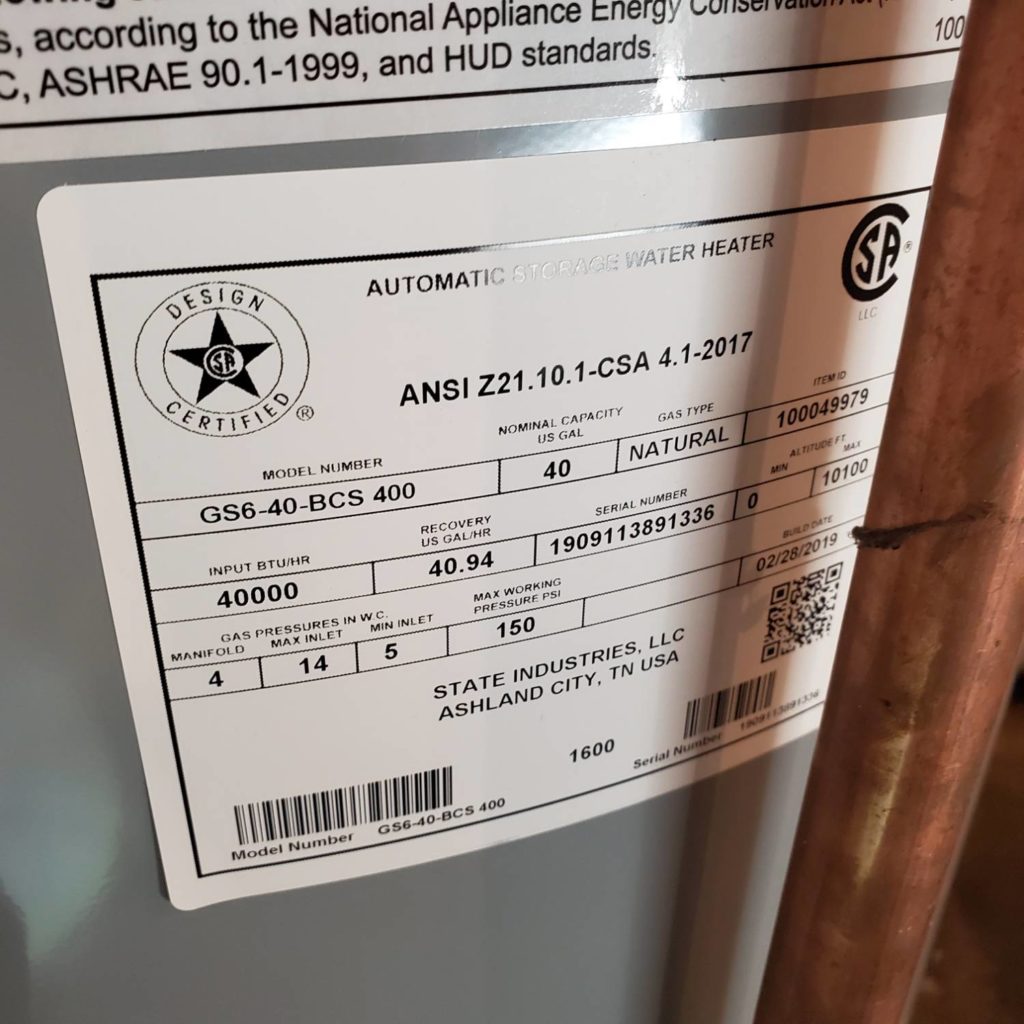
Here is an example of a water heater data plate. This is from a State which uses the first two digits of the serial number to determine age. This is 19 so this water heater is a 2019.
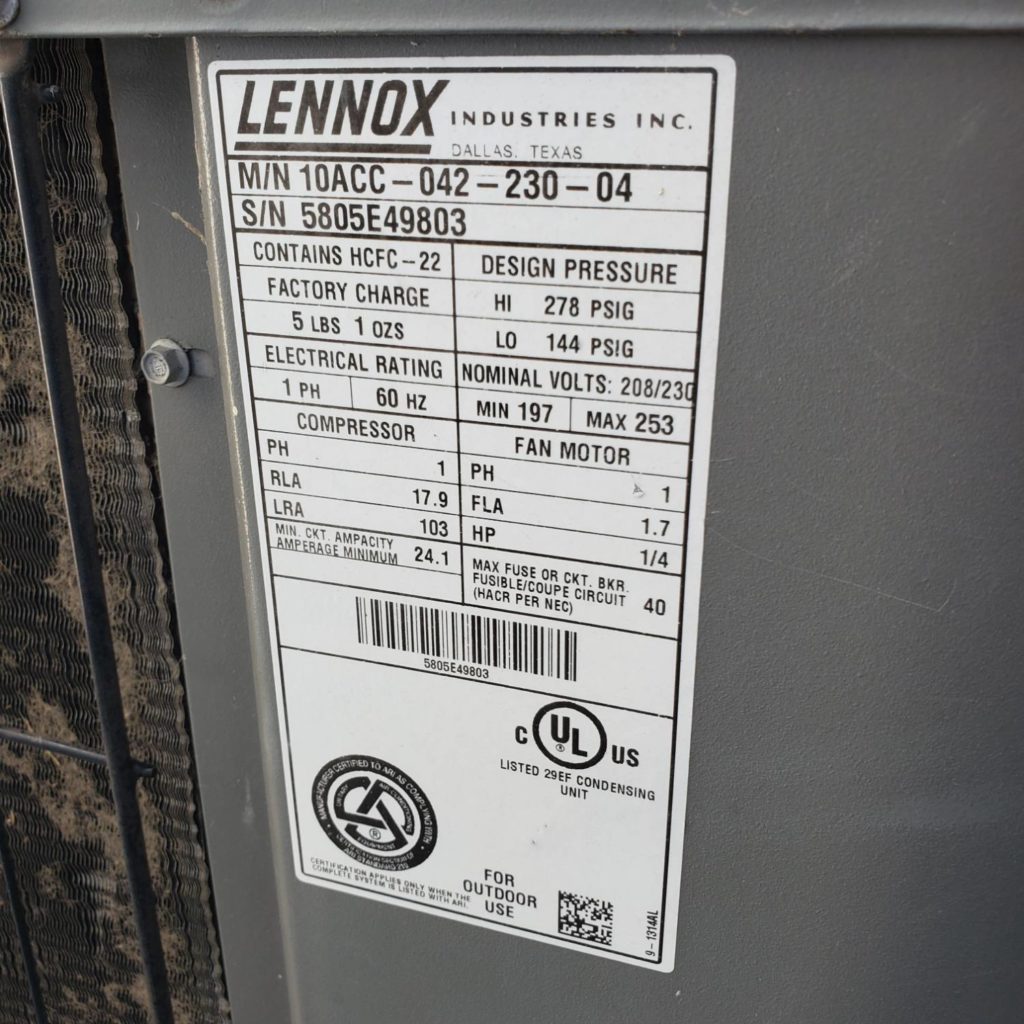
Here is an example of the exterior air conditioning unit (condenser). This unit was a Lennox and on Lennox it’s the 3rd and 4th digits of the serial number that represent the year of manufacture. 05 are the 3rd and 4th digits so this one was built in 2005.
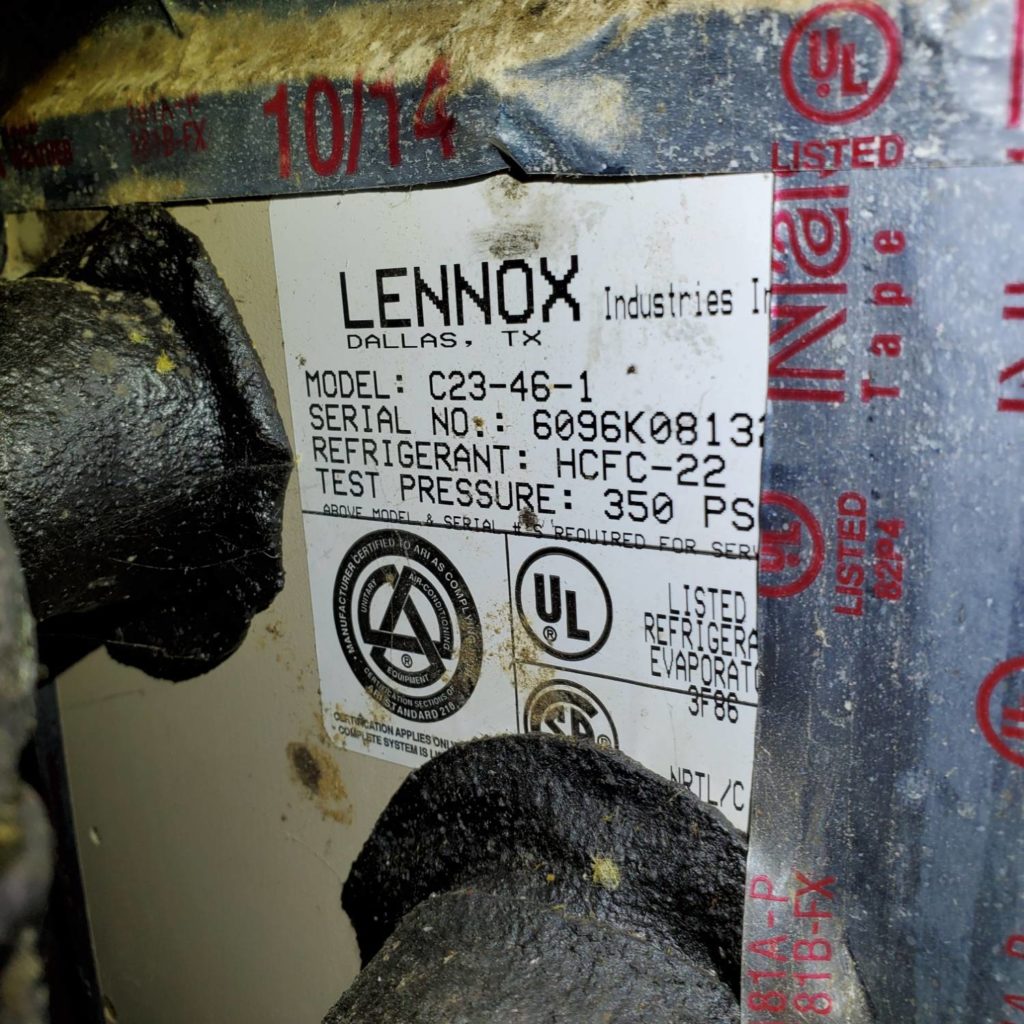
This next one is an example of the interior air conditioning unit (evaporator). These are usually rare to find unless the unit is 20 years old or newer. I run into a lot of times these labels are not placed on the unit making it impossible for me to determine the age. This is a label from a Lennox unit, the manufacture year is the 3rd and 4th digits of the serial number on these so this one was manufactured in 1996.
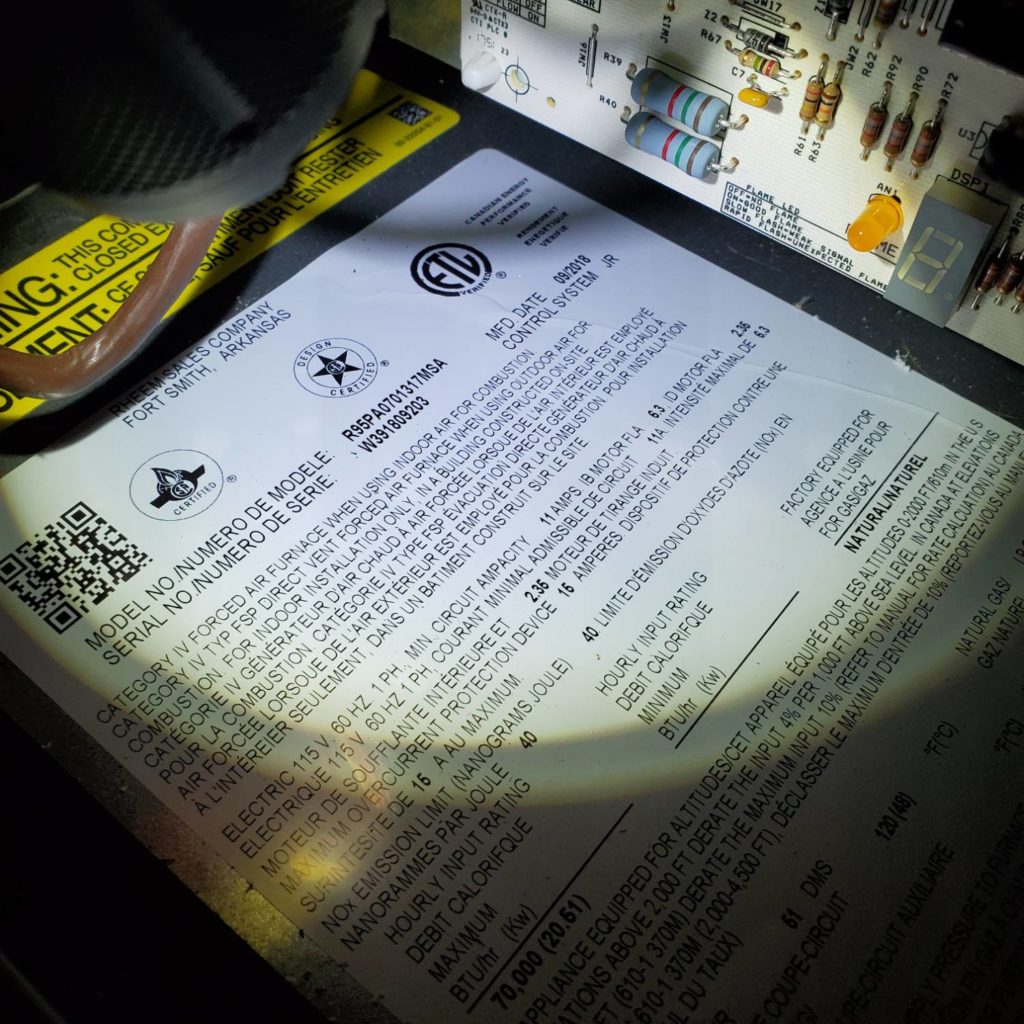
Here is an example of the furnace manufacturers label. This one is usually hidden inside the burner or blower compartment so the front access panels on the furnace would need to be removed to find the data label (which I do not recommend doing unless you are experienced in doing so). This is a Rheem so the first 4th and 5th digits of the serial number is the year of manufacture This is one of the easy ones that has the date of manufacture right on the label. This one was manufactured in 2018.
4) Roof Condition
The condition of the roof will be a little harder to figure out without getting up on the roof. There are a few ways to tell the age and condition however by looking at it from the ground.
There are two main types of asphalt shingle roofs in this area. They are 3-Tab and Architectural type.
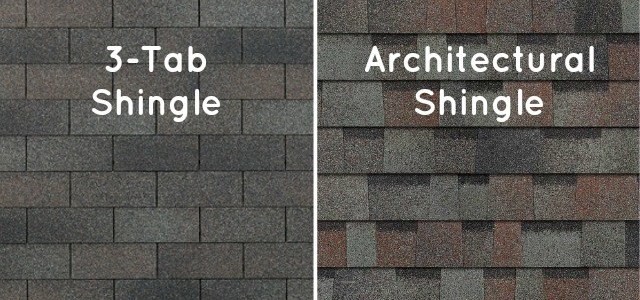
3-Tab style shingles have been around longer than the architectural type. The 3-tab shingle is thinner and 50% lighter than the architectural type shingle. Its life span is also 5-10 years less than an architectural type shingle lasting only around 20 years (where as an architectural type can last 25-30 years). The price difference between the two styles is not much and that’s why most people now are going with the architectural type when they replace their roof covering.
Visually from the ground you should be able to tell whether it’s a 3-tab shingle or an architectural type shingle. Architectural type has more variation in its design compared to 3-tab, which has the same uniform shaped tabs throughout.
It’s important to know the difference in the two of these styles because 97% of the time if a roof has a 3-tab shingle on it, it’s an older roof.
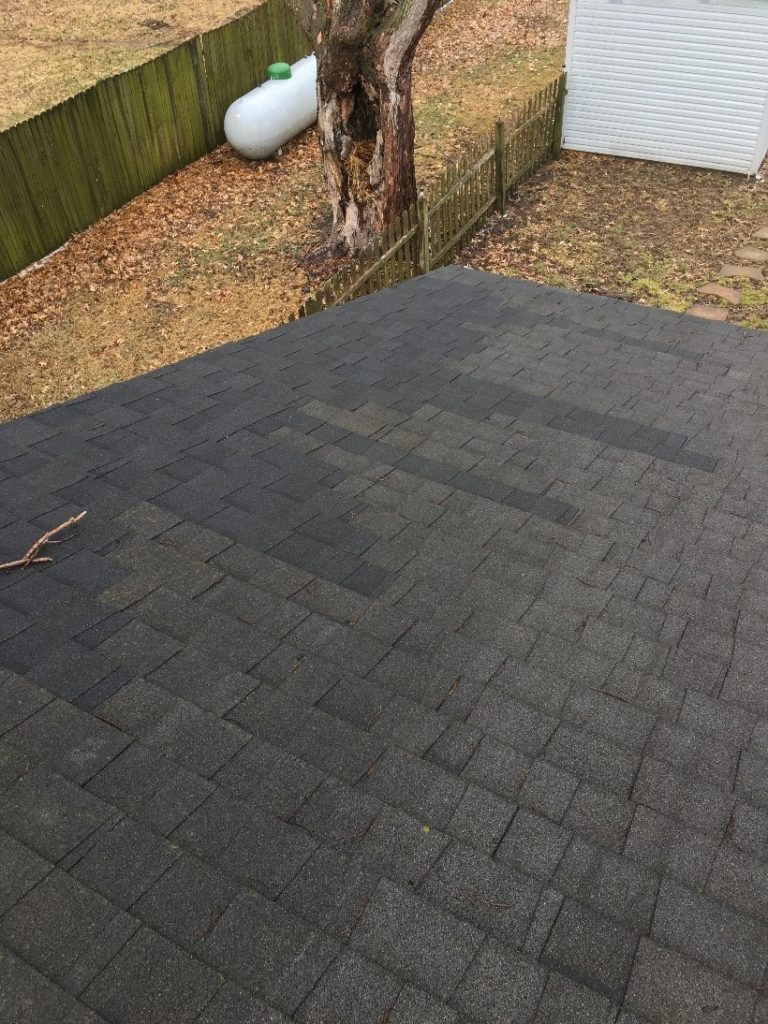
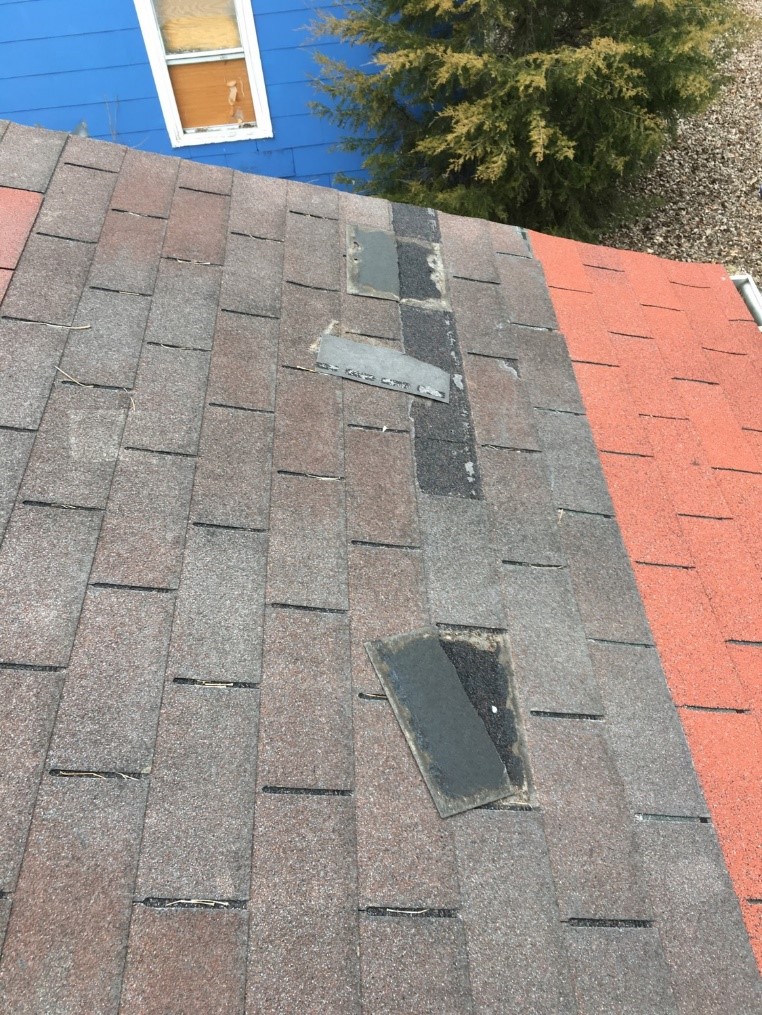
You can also look for a few other things from the ground to tell the condition. Look for different color areas. Sometimes if the roof suffered damage or tabs blew off there can be areas of replaced shingles that weren’t quite matched in terms of shingle color. Below is an example of what I mean. You can see the area near the left edge is a darker color than the rest of the roof. That’s because the shingles are newer and haven’t had time to fade yet. This tells me the roof suffered some damage here or the shingles were worn to a point where they needed replaced.
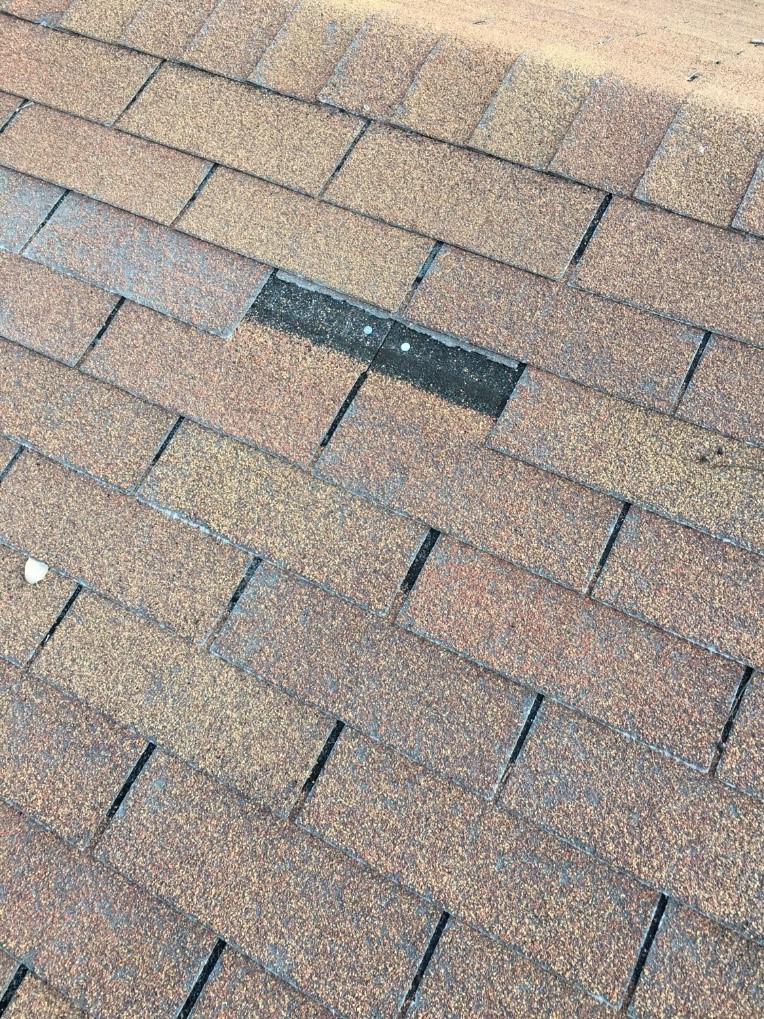
Missing tabs and Missing shingles. This isn’t as common of an occurrence in architectural type shingles because they are stronger and heavier than 3-tab. 3-tab shingles tend to uplift more easily. Here is an example of missing tabs:
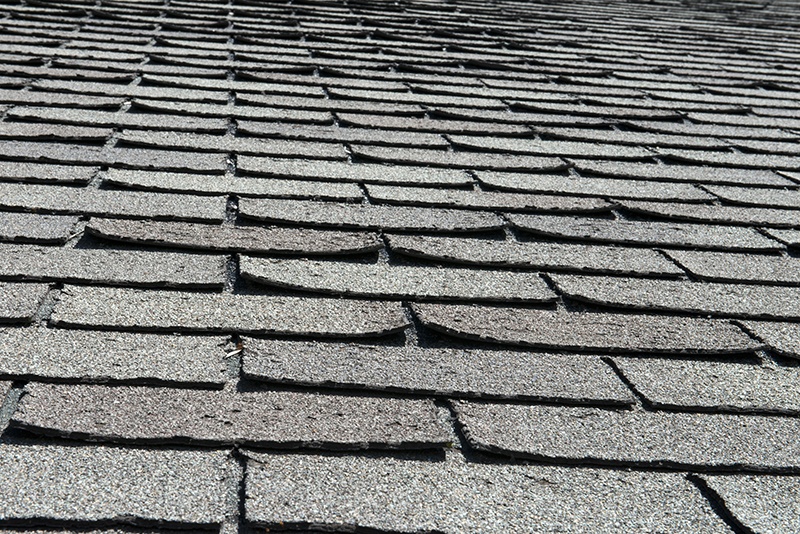
Curled or Cupped shingles. Look for areas where shingles are curled, this is a sign that the shingle need replaced. Here is a picture of curled and cupped shingles:

Replacement of a roof can range anywhere from $4000-8000 depending on size, complexity, and the company you hire. If your roof has multiple layers of shingles that can also add to the cost of replacing it because it takes longer to remove the old shingles.
5) Foundation
The foundation is the thing most buyers worry about. It’s always to first question I get when the client shows up: “How’s the foundation look?” (along with the roof). Mainly because it’s one of the most expensive things to repair if it does have issues. Here are some things you can look for on foundations:
Large cracks. It’s common for people to see any kind of crack and immediately think the house is collapsing. Though most foundations have cracks, that doesn’t mean they are the kind to worry over. Hairline cracks are nothing to worry about, most of the time those types of cracks are just shrinkage cracks from when the foundation was curing (some inspectors refer to these as “typical cracks”). Many homes have these. The type of cracks you need to watch out for are the kind that are 1/4” or wider. Cracks like that or cracks that have displacement need to be evaluated by a foundation professional before they become an even bigger issue.
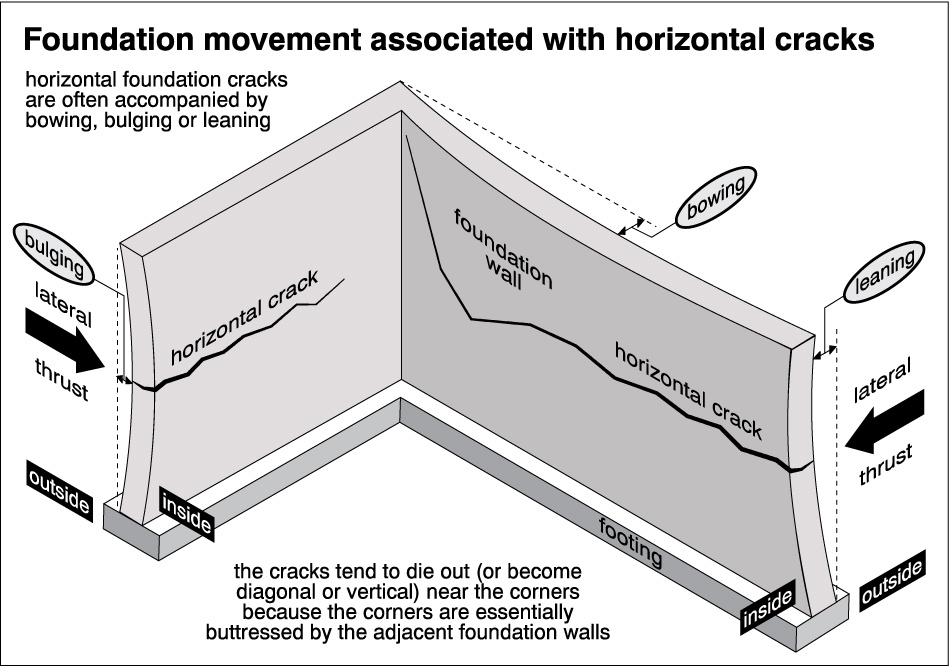
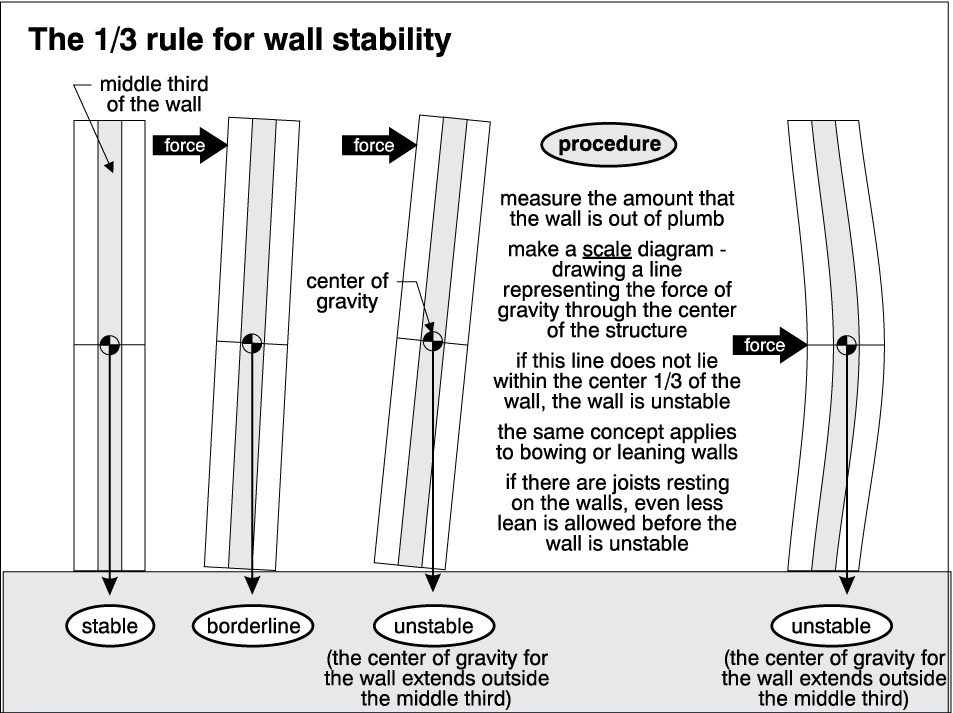
Bowing, Bulging, Leaning. If a foundation wall is bowing, bulging, or leaning significantly then it needs to be looked at by a foundation professional. Slight bows, bulges or leans should be monitored but many not need any kind of immediate repair unless they appear to be actively moving.
Shearing. When a foundation shears it means the bottom part of the wall is moving inward off the footing leaving a lip under the foundation wall.
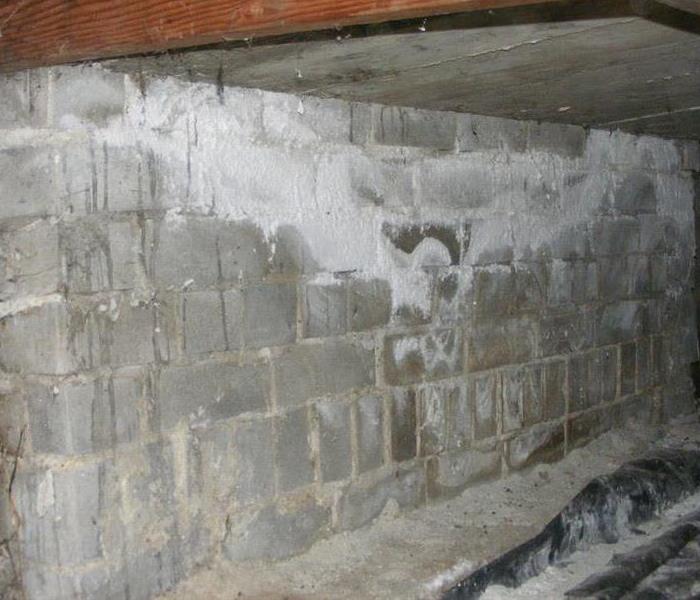
Leaks. Leaks can be easy to find, and they can be hard to find. If the basement if full of storage they may be hard to spot. If it hasn’t rained in a while, they can be hard to spot too. Look for stains on the foundation walls or floor. Look for a white powdery substance called efflorescence on the foundation walls, this is a sign of moisture intrusion through the concrete.
Repairing foundation issues can cost anywhere from $500 to $10,000+ depending on the issue.
- Repairing small cracks can cost around $250-800
- Repairing bowing walls can cost $350-1000 per reinforcement
- Sealing and waterproofing can range from $2000-6000
Hopefully this helps with your home buying process!